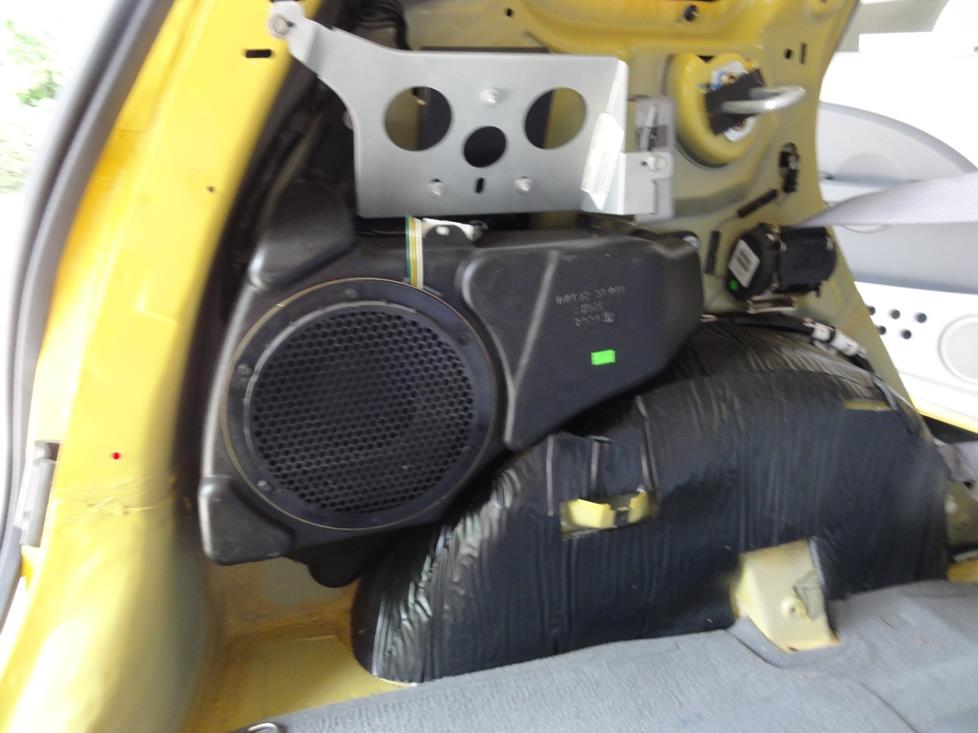
Driver Side A Pillar Speaker Removal
Data: 1.09.2018 / Rating: 4.6 / Views: 655Gallery of Video:


Gallery of Images:


Driver Side A Pillar Speaker Removal
For some rattles or creaking, this is a link of my creaking sound close the Bpillar, driver side. The thing appear when the weather is a bit more hot, around 10c, or when I beat the car for around 2030 mins. Need Replacement A Pillar Trim Nov 18 2013, 10: 15am So last weekend my drunk buddy pulled himself into my truck by the plastic A pillar trim instead of the grab handle like a normal person Snapped the damn thing right off. Re: Removing driver side Cpillar interior trim piece Keith, yes, the high (top) part is on the left, and bottom of the cover is on the right. The real life upper edge (that which is closest to the rear window) is the upper edge of the pillar cover picture. 5) Disengage driver side front pillar garnish fixing clip and metal clip with panel removal tool, cut clipA with cutter knife and then remove front pillar garnish. Mustang GT with premium audio system question: How do I remove the driver's side door speaker (next to Apillar) Answered by a verified Ford Mechanic We use cookies to give you the best possible experience on our website. Pop off the little hole cover towards the top, remove the 10mm bolt, then pull directly towards the passenger piller to pop clips, then pull up. Unplug any wiring from the pillar if the pillar has gauges or a speaker on it. Repeat these steps for the driver's side, with the exception of the grab handle, since. BMW interior accessories has always been a big part of our business, going back all the way to our E30 M3 days! Whether it's stereo equipment, amps, aux adapters, center console trays and cupholders, alarm kits, multimedia accessories, gauges and gauge kits, pedals, floor mats, shift knobs and boots, ebrake handles and boots, interior trim, switches, or knobs we have you covered. The problem was, although the passenger Apillar trim came off easily, the driver's side did not. I used the location of the spring clips on the passenger Apillar trim as a guide to locate the flat bladed screw driver (the wider the better) I had to use to get the driver's Apillar cover off. Ez Lynk wPPEI Tune and indash iPad Mini for gaugestuningshift on fly The airbag plastic clip pops out and there is a torx screw underneath. Once that is removed the apillar just slides upwards and outwards towards the rear of the car. Don't know about the passenger side, but I pulled the driver's side off and replaced it with a grab handle. Just worked my fingers between the edge of the trip and the headliner and pulled. The tweeter will be installed in the APillar trim, so we have to remove that. Just remove it (there are two screws under the clips) and then pull the APillar away. Its much easier than the driver side. Okay, the APillar is out of the way. Remove the small screw cover, and screw near the top of driver side Apillar trim. Remove the trim, and speaker wire connector, if yours has the tweeter in the trim. Part 1: Installing the Subwoofer and Wiring. If you install the amp inside the dash on the drivers side or are using a sub that mounts on the drivers side, such as the NVX BETSLAS, then run the wire on the drivers side. Position the speaker under the rear and side lips. 5950 inter tube placed under the. (drivers side), Center Pillar Lower Trim (drivers side), Trunk Side Trim (drivers side) Sedan, Quarter Lower Trim (drivers side) Wagon Removal and 1. 1) Gently pull top edge of side pillar panel from vehicle releasing clips. 1) Pull side panel down and back away from front dash to remove. 1) Repeat steps for driver's side pillar side panel and remove. What is the 1998 Chevy Silverado door panel removal process, driver side? It is the driver's door and the Chevy is a ext cab twodoor automatic with windows and power locks. Feed the wiring through the door pillar. Cover the door hinge spring with a heavy towel. Using tool J or its equivalent, insert the blades of the tool between the. 2 The OEM optional Reverse Sensing System (76R) uses the driver side passenger door speaker for the audio warning. Audio for this option will be lost when speaker is removed for K9 door panel. Remove the center pillar upper trim panel. Refer to Center Pillar Upper Trim Panel Replacement in Interior Trim. I need to remove the interior panel on the driver side of a 2002 2 door Chevy Cavalier so I can get at a dent behind the driver's door. Pillar and side trims Special tools 3392 Removing pliers T Release tool. (valid for driver's side only). Repair Manual, Body Exterior, Repair Group 1 B pillar 2 Speaker bracket 3 Clip 3 4 Clip For body flange 5 Body flange 6 Speaker 7 Side panel trim. 7075 On the driver's side, to access the wires for the vanity and dome lights. To run speaker wires (to avoid power wires along the cowl side trim at the base of the door opening). These instructions supplement the service manual's instructions for removing and installing the Apillar cover. Remove the windshield pillar posts from each side of the windshield. Remove the screws that retain the pillar posts to the windshield frame and then pull the top of the post toward the center of the car to disengage the fasteners on the back of the post. Discussion in '6th Gen Dodge Charger in the dash and plan on adding a new set of 3 12 speakers there. So far, I've seen alot of threads that specify the removal of the A Pillar in the process. my bluetooth stuff like the phone calls come out of the driver side speaker. The interior door panel has to be removed to access components behind it. Such as, door speaker, side airbag, window regulator, door latch and door mirror. reverse order of removal instructions. Be sure to replace any damaged door panel clips. Properly route all wiring as before. 2014 WK BodyInteriorPANEL, APillar TrimRemoval 1. Using a trim stick C4755 or equivalent, release the clips (2) and separate the Apillar trim from the Apillar (1). 2014 Jeep Grand Cherokee Interior tJ rim removal driver side a pillar speaker removal 2013 f150 ebooks in PDF, MOBI, EPUB, with ISBN ISBN and file size is about 59 MB Labels: driver side a pillar speaker removal 2013 f150 More related with driver side a pillar speaker removal 2013 f150: Farmall 806 Repair Manual Toyota Coaster I Will Greatly Appreciate If You Can Give My Video Thumbs Up And Subscribe To See Future Videos Thank You Very Much 3 Series, 5 Series, 6 Series, 7 Series, M5, 9703, BMW, 5 Series E39, 528i, E46. Remove driver side pillar trim. Tacomas ( )' started by river rat 69, Mar 11, They can be removed with a screw driver as well as with a socket. I first tried a screw driver, but it was to tight, so I used a socket and easy off. RoadPro RP108C 234 CB Extension Speaker with Swivel Bracket 17. 5) Disengage driver side front pillar garnish fixing clip and metal clip with panel removal tool, cut clips with cut ter knife and then remove front pillar garnish. Left Hand Driver Side A Pillar Trim Panel. We have more than 15 years of OEM parts experience. Notes If you are unsure if this is correct for your vehicle. dodge ram ramcharger maroon pair Apillar trim panels OEM LH RH. How to take off the front door panels of a 12th generation Ford F150 in order to upgrade the speaker, add soundproofing material, fix a faulty switch, replace the power window motor. 0 out of 5 stars Ford F150 A Pillar Left Driver Side Interior Grey Trim Handle OEM NEW Welcome to Tacoma World! You are currently viewing as a guest! To get fullaccess, you need to register for a FREE account. The system has a subwoofer on the rear package shelf, a midrange speaker in each of the front doors and rear doors, with a tweeter mounted in the Apillar on the side of the windshield. 5 round, and the rear door speakers are 5. Toyota RAV4 Door Panel Removal Guide To remove the OEM door speaker, you will need to drill out the metal rivets. You can replace the front or rear door speakers with either 5 14 (5. Here I show advice on how to remove the 2015 GM pillar and the dash speaker cover to get to the dash speakers and mids they suck! GM Pillar removal 2015 GMC audio upgrades Driver pillar. 2007 ACCESSORIES EQUIPMENT Interior Trim and Paneling H3 SPECIFICATIONS Driver Side (1st Design) or Door Lock and Side Window Switch Replacement Driver Side (2nd Design) or Door Lock and Side Window Switch Passenger Side. 2007 Hummer H3 2007 ACCESSORIES EQUIPMENT Interior Trim and Paneling H3 MY Sunday, March 29, 2009 10: 19. (Use the R bracket on the driver side, as shown in the picture. ) HINT: the edge of bracket will sit almost exactly along the inner edge of the Bpillar. The installation kit includes a pair of poprivets. Pillarmounted gauges for Ford vehicles are easy to install, but first you need to know how to remove the Ford Apillar cover trim. This interior trim covers the upright post of the windshield, left of the driver. Front Speaker Removal and Replacement Cadillac CTS. More speaker and amplifier removal below. Cadillac CTS How To Remove Side Pillar Tweeter: 1. 1) Pry Air Bag logo from side pillar. 1) Remove Air Bag logo and set to side. Driver's side, along side wall, unscrew lock down tab. 1) Pull edge of side panel away from car. Passenger side doesn't matter anymore I got my wire routed that side. But I NEED the driverside off completely no way around it. I need the very front dash cover off on that side and the A Pillar cover blocks me from removing that side. ENTERTAINMENT End Of SiePILLAR ANTENNA REMOVAL 1. Disconnect the negative battery cable. Remove the driverside front side trim. Driver Side B Pillar removal tipspics request That would be great, the colors of the passenger side rear speaker. I read somewhere that they should be twisted together and both the same color, with the negative having a black line obviously. I recently bought a 2006 Chevy Trailblazer LT and I noticed a sound coming from what looks like a small speaker on the drivers side B pillar, just behind the drivers side window. title: interior panels trim: upper instrument panel: removal; 2013 my rav4 [ removal remove no. 2 speaker hole cover click here 18. 2 speaker assembly click here 20. remove front pillar garnish lh click here 21. remove front pillar garnish rh click here 22. Jeep Grand Cherokee Interior trim removal Removal Amplifier 1. Disconnect and isolate the battery negative cable. Using a trim stick C4755 or equivalent, disengage the retaining tabs that secure the door sill scuff plate to it from the front seat cushion outboard side shield (4). In last months column, I wrote about kick panel speaker mounting, which involves the (often) customplacement of speaker drivers in the panel next to your feet, adjoining the throttle and brake pedals, as well as the mirror image panel on the passenger side, below the glove box. Search Results for A Pillar Interior Trim Parts. The form below allows you to search for car, truck, motorcycle or boat parts in real time. For best results, please be specific and be patient. While pressing the tabs of the clip in the direction of the arrow (1) shown in the figure, press it in the direction of the arrow (2) to detach the shortcord clip from the Dpillar trim. Remove the 10mm bolt securing the side portions of the seat. Release the spring clip on the back of the side cushion. Phillips Screwdriver 10mm Nut Driver Panel Removal Tool Window Crank Removal Tool 9. Using a 10mm nut driver remove the bolt securing the door handle. Phillips ScrewdriverPanel Removal Tool Rear Speaker
Related Images:


- The wife swing
- The hobbit
- International Criminal Law Antonio Cassese
- State trance top 2018
- Dvd cyberlink powerdvd
- Blacklist game pc
- Rock n roll train
- Final fantasy tactics
- EuroSexParties Vanessa Vaughn
- Sony ericsson w580i
- Starting over again dvdrip
- Ultimate spider man hindi
- Despicable me nor
- Radiant darkness emily whitman
- The big bang theory season 5 hdtv
- A new kind of science
- Now whats next
- V for Vendeta
- Favourite worst nightmare
- Window 7 32 and 64 bit iso
- Celesty vendetta 2018
- The Passing Show The Life and Music of Ronnie Lane
- Green lantern s01e11
- The four brothers
- Teenage mutant ninja web dl 1080p
- One piece new world
- Anita marta
- Heads will rol
- Parenthood season 6 episode 7
- The forgotten crown
- Life a women
- Va best songs 2018
- 11 05 2018
- Dont go home
- Manual De Trastornos Musculoesqueleticos Pdf
- Stargate universe complete season 2
- Libro Verde De Educacion Especial Pdf
- The gates season complete
- E mail marketing for dummies
- The resident 2018
- Crack deep freeze standard 7
- Secrets from her past
- Whose line is it anyway whose line is it anyway
- Gcse Statistics Answers For Workbook Higher
- Walking dead season 2 crack
- Call the midwife the album
- Kronos quartet 25 years
- Cultura paracas resumen con imagenes
- Antwoorden Jong En Oud Economie
- WWE RAW Ultimate Impact
- Hang low nikki
- She likes to watch
- Ao Haru Ride horriblesubs
- Run and kill
- El rey leon spanish dvdrip
- Csir net life science books arihant
- Gary unmarried Season 2
- Descargar Serie La Casa Del Placer Pdf
- Miami ink season 6
- Chima lego s01e08
- Flirting with boys
- Satu dekade pasca krisis Indonesia
- Endocarditis infecciosa harrison pdf
- Mortal kombat universe
- Wendy higgins epub
- The blacklist s02e01
- In laws 1979
- Amazing adventures riddle of the two knights
- Happy new year songs 1080p
- 47 ronin ita
- Pdf Microeconomia Y Conducta Robert Frank
- Lord of rings return king 1080
- Captain america the winter soldier captain america the winter soldier
- Antwoorden Jong En Oud Economie
- The guardian of the galaxi
- Electrical Engineering Books Sinhala
- Mtv unplugged alice in chains
- Fix me raign
- Artifex tumbler instructions pdf
- The mothman prophecies xvid